
In this post, I will discuss an Overview of Oracle Autonomous Linux Operating System which was announced at Oracle OpenWorld 2019. I will also cover How to Create your First Autonomous Linux on Oracle Cloud & access it over the Internet.
Note: In my previous episode (https://k21academy.com/31), I covered the 8 Important Key takeaways from Oracle OpenWorld 2019 & the 1st point was about World’s First Operating System or Autonomous Linux.
Now, before I show you how to create a step-by-step Oracle Autonomous Linux & how to access it, let’s first understand what exactly is Oracle Autonomous Linux.
Overview Of Oracle Autonomous Linux
1) Oracle Autonomous Linux is based on the native Oracle Linux operating environment along with the new Oracle OS Management Service.
2) It uses Machine Learning (ML) & Artificial Intelligence (AI) to deliver security & Lifecycle Management like Autoscaling, Management & Monitoring of operating system.
3) Oracle Autonomous Linux executes automatic patch updates and tune without human interaction, thus improving user productivity, more security, and less downtime.
4) Oracle Autonomous Linux is binary-compatible with Red Hat Enterprise Linux, allowing IBM Red Hat customers to immediately start using the service with their current applications on Oracle Cloud Infrastructure.
5) Last but not least, it is available with Oracle Linux Premier Support at no additional cost to Oracle Cloud customers.
How to Create Oracle Autonomous Linux
1) Register & Log into the Oracle Cloud account, cloud.oracle.com
Note: First, you should have an Account at Oracle Cloud and if you don’t have one, then you can register FREE using my step-by-step video & guide that I covered in episode 30. You can get it by visiting k21academy.com/30 or k21academy.com/cloud01.
2) Configure Network: Next, as we want to access this Autonomous OS over the internet, so we’ll create it in the Public Subnet and assign Public IP in addition to configuring Internet Gateway on VCN.
Note: If you are not familiar with VCN, Subnet or Internet Gateway then learn about them in one of my previous episodes on networking at https://k21academy.com/1z093215. Trust me, it is easy and should not take more than 15-20 minutes. If you hit an issue, leave a comment and either I or someone from my team will help you.
3) Generate SSH Keys: Once you are done with creating VCN & Public Subnet, then you also need one more thing i.e. SSH Keys Pair that you generate using Puttygen, so that you can access the Autonomous Linux using SSH private key.
Note: If you are new to SSH Keys or don’t have one, then create them using the step-by-step guide that we use in our Oracle Cloud Training. Check at https://k21academy.com/oci51.
4) Sign In: Once you have all the things sorted, sign in to Oracle Cloud Account, and you will land on the OCI Console.
5) Create Autonomous Instance: Click on the hamburger menu on the top left side, select Compute & then Click on Instances.

6) Click on “Create Instances”.
7) Enter the name of the Instance, & Click on “Change Image source“.

8) Under Oracle Images, Choose Oracle Autonomous Linux. Scroll Down, Accept the T&C & Click on “Select Image”.

9) Then choose Availability Domain inside which you want to create the Instance, If you want higher CPU & higher memory, then click on “Change Shape“.
Note: Want to know more about Region & Availability Domain in OCI, then click HERE.

10) Now, Under networking, choose the VCN & a Public Subnet (we are choosing Public Subnet because we want to assign Public IP to the Instance). Make sure you check the “Assign Public IP” box. Leave all the field by default & under “Add SSH key”, Copy the content of SSH Public key. Click on “Create”.

11) A few minutes later, you will notice that the status of the Instance has changed from Provisioning to Running. You will get a Public IP you can use to connect to the Instance through PUTTY.

Connect to the Oracle Autonomous Linux Instance
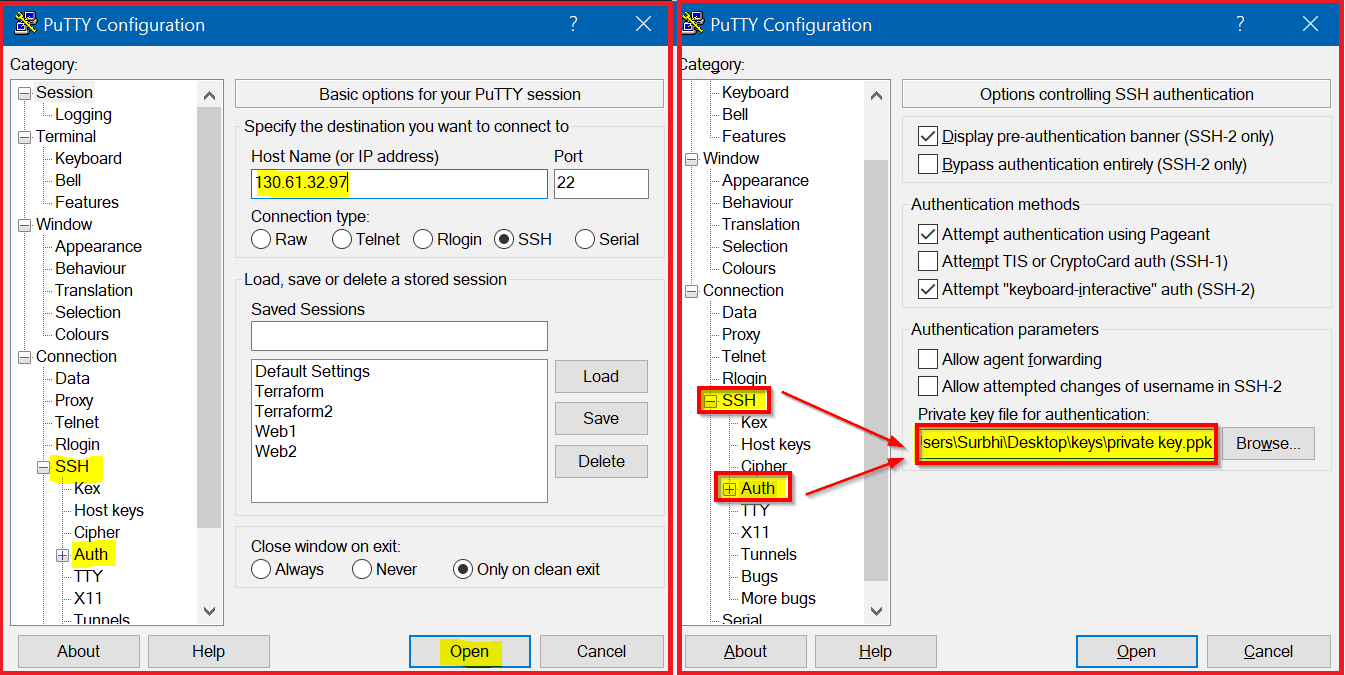
1) To connect to the Instance you will need the Public IP of the Instance & the PuTTY Software.
Enter the Public IP Address in the Hostname, then add the SSH Private key (That we created before) under SSH & then Auth. Click on “Open”.

Note: If you face any issues while connecting to the Instance, then check HERE for the troubleshooting steps.
Related/Further Readings
- [Video] Oracle Cloud: Create VCN, Subnet, Firewall (Security List), IGW, DRG: Step By Step
- Region & Availability Domain (AD) in Oracle Cloud Infrastructure (OCI)
- How to Generate SSH Keys Pair for Oracle Cloud (Windows/Linux)
- [Troubleshooting] Compute (Linux/Windows) & Database Instance Connectivity Issue in Oracle Cloud (OCI)
- How to Connect to an Autonomous Database on Oracle Cloud?
- FREE Guide to Register for Oracle Cloud Trial Account
- SOAP Vs REST APIs In Oracle Integration Cloud (OIC)
Next Task For You
Begin your journey towards becoming an Oracle Cloud Certified Architect Associate by joining the FREE MasterClass on How To Become Oracle Certified Cloud Architect Associate in 8 Weeks.
Click on the image below to Register for the FREE Masterclass NOW!
FREE Community
The post How to Create Oracle Autonomous Linux On Oracle Cloud appeared first on Cloud Training Program.


